
Hotline:
400-863-1908Monday to Friday: 9:00-18:00
In the field of basic brain science research, the accuracy and reliability of intracranial drug delivery techniques are crucial for ensuring the validity of experimental results. Below are three common intracranial drug delivery methods along with their characteristics:
1. Single Injection Administration: A stereotaxic instrument is used to locate the target brain region, and then a microinjection pump is employed to precisely inject the drug into the designated site.
Advantages: Simple operation, accurate positioning, and precise control over drug dosage and injection rate.
Disadvantages: Unable to simulate the long-term effects of drugs in the body.
2. Multiple Repeat Administrations: A cannula is implanted on the skull of the experimental animal, through which drugs are administered repeatedly. The cannula can be retained for an extended period to facilitate multiple drug administrations.
Advantages: Enables simulation of the long-term effects of drugs in the body, reduces the number of surgeries, and minimizes animal stress.
Disadvantages: Requires regular drug replacement or supplementation, and the operation is relatively complex.
3. Sustained Release Administration: An implantable sustained-release pump containing the drug is surgically implanted into the animal's body. The drug release rate and duration can be adjusted as required.
Advantages: Maintains a stable drug concentration for a long time, reduces the number of surgeries, and lowers animal stress.
Disadvantages: The surgical procedure is relatively complex, the cost is high, and the maintenance and replacement of the implantable pump require professional equipment and technical expertise.

This article focuses on cannula-based drug delivery, which is mainly used for repeated drug administration to the target brain regions of experimental animals such as mice, rats, and monkeys. It can also be used in conjunction with supporting optical fibers (for optogenetics), allowing optical stimulation of the target brain region during or after drug administration. It is commonly applied in research related to animal models of human neurological diseases, advanced brain functions, emotions, and cognition.
1. Experimental Preparation
1.1 Equipment and Accessories
Prepare the following equipment and accessories: stereotaxic instrument, microscope, cold light source, heating pad, surgical pad, cannula holder, surgical instrument kit, alcohol cotton balls, dry cotton balls, cranial drill (with drill bits), isoflurane gas anesthesia system (or injectable anesthetics), cannula drug delivery system (including catheter, injection inner tube, catheter cap, PE tube, and small screws), and micro-drug delivery system (including microinjection pump and microsyringe).
1.2 Reagents
Prepare reagents such as povidone-iodine, alcohol, hydrogen peroxide, normal saline, dental cement (dental monomer and dental powder), antibiotics, and isoflurane (or injectable anesthetics).
2. Experimental Operation
2.1 Determine the Target Brain Region
Based on brain atlases or relevant literature, determine the three-dimensional coordinates of the target brain region: AP value (Anterior-Posterior, Y-axis, from head to tail), ML value (Medial-Lateral, X-axis, from midline to sides), and DV value (Dorsal-Ventral, Z-axis, from dorsal to ventral).
2.2 Animal Anesthesia and Fixation
Anesthetize the animal and fix its head on the stereotaxic instrument. Mice require a black adapter, while rats can be fixed directly.
2.3 Drilling and Cannula Implantation
Level the skull, then drill a hole near the target brain region (simultaneously drill 2-3 small holes near the main hole for inserting cranial screws, which serve as attachment points for dental cement to prevent the cement from falling off. Additionally, the diameter of these small holes must be smaller than that of the cranial screws to ensure the screws can be tightened and provide sufficient adhesion). Gently pierce the dura mater above the target brain region with a needle to expose the brain tissue (the dura mater at the cranial screw fixation site does not need to be pierced).
2.4 Fixation and Recovery
Screw the cranial screws into the small holes approximately three turns. Use a holder to slowly implant the prepared catheter into the cranium, and wrap and fix the screws and catheter with dental cement.
After the dental cement solidifies (approximately 15 minutes), remove the holder (taking care not to move the catheter), insert the catheter cap, and tighten it. Decide whether to suture the skin as needed. During the animal's recovery period (which takes about 2-3 days), apply roxithromycin ointment to prevent infection, and supplement with sugar-salt solution in a timely manner to maintain the animal's energy levels.
2.5 Drug Administration
Preassemble the injection inner tube, PE tube, locking nut, and syringe. Use the injection pump to draw the drug, and mark the position of the drug solution on the PE tube (primarily used to observe whether the drug liquid level drops during the injection process). Remove the catheter cap, slowly insert the injection inner tube into the catheter, and fix it with the locking nut.
Set the injection volume and rate of the injection pump, then start the injection. After the injection is completed, wait for 10 minutes to allow the drug to fully diffuse, then slowly pull out the injection inner tube, reinsert the catheter cap, and tighten it.

3. Precautions
Non-metallic components such as non-metallic catheter caps, catheters, injection inner tubes, catheter cap cores, locking nuts, and PE tubes are recommended to be sterilized by methods such as high-pressure steam, ultraviolet radiation, or ethylene oxide.
Before using the PE tube, one end can be appropriately expanded or soaked in alcohol to facilitate the insertion of the injection inner tube. Ensure that the PE tube is sleeved over the outer layer of the injection inner tube. When inserting the injection inner tube, it is essential to note that the PE tube must be sleeved over the outer layer of the white layer (outer layer of the non-metallic tube) to prevent falling off or loosening, which may cause liquid leakage.
Due to the presence of dead volume inside the PE tube and the injection inner tube, after assembling the injection inner tube, PE tube, locking nut, and syringe, the injection solution (e.g., drug) should be used to fill the PE tube and the injection inner tube without any air bubbles before inserting into the catheter, to ensure the accuracy of the injected drug dose. Operation method: Push the syringe forward until liquid emerges from the front end of the injection inner tube, then insert the injection inner needle into the catheter for drug injection.)
4.套管选择
(1)微量给药单套管
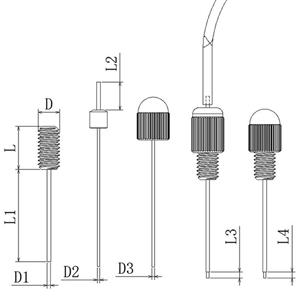
订货时,务必提前确认以下4个参数:
1)D1-导管的外径,有22G(兔子、猴)、23G(大鼠)、24(大小鼠)、26G(小鼠)和27G(幼小鼠)五种规格供选择。
2)L1-导管塑料基座以下金属管的长度,即动物颅骨表面至目标脑区的垂直距离(单位:mm)。
3)L3-注射内管插入导管后突出部分的长度(单位:mm),一般选择0.5或者1.0mm。
4)L4-导管帽插入导管后突出部分的长度(单位:mm),一般选择0、0.5或者1.0mm。
(2)微量给药双套管
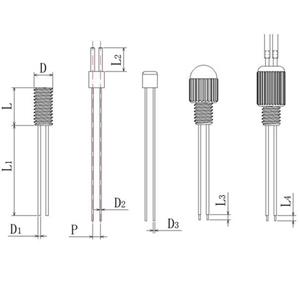
订货时,务必提前确认以下5个参数:
1)D1-导管的外径,有23G(大鼠)、24G(大小鼠)、26G(小鼠)和27G(幼小鼠)四种规格供选择。
2)L1-导管塑料基座下金属管的长度,即动物颅骨表面至目标脑区的垂直距离(单位:mm)。
3)L3-注射内管插入导管后突出部分的长度(单位:mm),一般选择0.5或者1.0mm。
4)L4<-导管帽插入导管后突出部分的长度(单位:mm),一般选择0.5或者1.0mm。
5)P-双导管的中心间距,即两个目标脑区的水平间距(单位:mm)。
5.订货信息
微量给药单套管
序号 | 1 | 2 | 3 | 4 | 5 | |
规格 | 23G(大鼠) | 24G(大小鼠) | 26G(小鼠) | 27G(幼小鼠) | 22G(兔子、猴) | |
型号 | M8010 | M8020 | M8030 | M8040 | M8050 | |
基座直径D(mm) | 3.50 | 3.50 | 3.50 | 3.50 | 3.50 | |
基座管直径D1(mm) | 外径 | 0.64 | 0.55 | 0.48 | 0.41 | 0.72 |
内径 | 0.45 | 0.38 | 0.34 | 0.25 | 0.41 | |
注射内管直径 | 外径 | 0.41 | 0.36 | 0.30 | 0.21 | 0.41 |
内径 | 0.25 | 0.20 | 0.14 | 0.11 | 0.25 | |
导管帽直径D3(mm) | 堵芯 | 0.40 | 0.30 | 0.30 | 0.20 | 0.40 |
导帽 | 5.0*7.0 | |||||
基座管长度L1(mm) | 需提供 | |||||
内管伸出长度L3(mm) | 需提供(范围:0-1.0mm) | |||||
堵芯伸出长度L4(mm) | 需提供(范围:0-1.0mm) | |||||
锁紧螺帽直径(mm) | 5.0*6.5 | |||||
PE管 | PE25(0.85*0.42mm) | |||||
微量给药双套管
序号 | 1 | 2 | 3 | 4 | |
规格 | 23G(大鼠) | 24G(大小鼠) | 26G(小鼠) | 27G(幼小鼠) | |
型号 | M8110 | M8120 | M8130 | M8140 | |
注射内管间距(mm) | 基座直径(4mm) | 0.8-1.9 | 0.7-1.9 | 0.6-2.0 | 0.5-2.0 |
基座直径(5.5mm) | 2.0-3.2 | 2.0-3.2 | 2.2-3.2 | 2.2-3.2 | |
基座管直径D1(mm) | 外径 | 0.64 | 0.55 | 0.48 | 0.41 |
内径 | 0.45 | 0.38 | 0.34 | 0.25 | |
注射内管直径D2(mm) | 外径 | 0.41 | 0.36 | 0.3 | 0.21 |
内径 | 0.25 | 0.2 | 0.14 | 0.11 | |
导管帽直径D3(mm) | 堵芯 | 0.4 | 0.3 | 0.3 | 0.2 |
导帽M4 | 5.3*7.0 | ||||
导帽M5.5 | 7.0*7.5 | ||||
基座管长度L1(mm) | 需提供 | ||||
内管伸出长度L3(mm) | 需提供(范围:0-1.0mm) | ||||
堵芯伸出长度L4(mm) | 需提供(范围:0-1.0mm) | ||||
锁紧螺帽直径(mm) | M4 | 5.3*6.5 | |||
M5.5 | 7.0*7.5 | ||||
PE管 | PE25(0.85*0.42mm) | ||||
Previous: Operational Procedure for Establishing Injury Models Using the Craniocerebral and Spinal Cord Injury
Copyright © 2019 Changsha Meyue BlO co., Ltd Hunan ICP Filing 19018469-1
Address:No. 186 Guyuan Road, Hunan University Science and Technology Park, High tech Zone, Changsha City Hotline:400-863-1908 Consultation:19892896528(Zhang)、19892863908(Hu)、19918939165(Jiang) Email:my@meyuecn.com

Follow Us
 简体中文
简体中文
 English